

|
Popular Study Series History No. 13: Rifle Making in the Great Smoky Mountains |
 |
Rifle Making in the Great Smoky
Mountains (continued)
The Making of a Rifle
The essentials of a rifle are: first, the barrel; second, the lock and trigger, which in the American rifle are entirely separate mechanisms; third, the stock; and the smaller parts—the sights, butt plate, thimbles for the ramrod, and brass or iron for the patch box and trigger guard.
The barrel was made from pure iron in one of three ways. The first method: a solid bar of iron of the required length and diameter (usually 4 feet long, octagonal, and from an inch to an inch and one-quarter in diameter) was forged and shaped on anvil and grindstone.3 The second method: two halves that would eventually be a barrel, each about 4 feet long, an inch to an inch and a quarter wide, and about half an inch thick, were channeled with a swage on one longitudinal side to produce a semicircular groove the entire length of the prospective barrel. Then the two halves were welded together, making a complete barrel with a hole through it. The third method: A strip of iron some 4 inches wide, of the proper length and the thickness of the barrel wall, was heated, a few inches at a time, and laboriously welded spirally about a steel mandril until the desired length of barrel was attained.
After the rifle barrel was made by any one of the three methods just described, the next step was to clean the bore and straighten the barrel. The bore was cleaned by means of a long bit. A long bit is a rod of iron some 4 feet long, having welded on one end a steel cutter, oblong in cross diameter, and with four sharp cutting edges, each some 10 inches in length. Ordinarily, the cutting surface of a long bit is about a quarter of an inch in the lesser diameter, and three-eighths of an inch in the greater, but the size depends very largely upon the diameter of the bore of the gun. Running the length of one cutting surface of the long bit, a thin piece of hickory was fastened on the narrower side in such manner that a thin shim could be placed underneath the middle of it. By so doing, the cutting edges of the long bit were kept in contact with the metal of the barrel. The slight offset produced by the hickory stick gave clearance for the shavings. The long bit was turned in the barrel by hand or with a bit brace and gradually worked the length of the barrel and back again until it would cut no more. Then the shim was made a bit thicker in order to make the cutting edges of the long bit press more heavily against the wall of the barrel, and the process repeated. The final result of dressing out with the long bit was a mirror-bright hole through the barrel of the rifle, isodiametric and true.
Next the barrel had to be straightened. Frequently during the several processes involved in the fabrication of the barrel as outlined it would become bent. A perfectly good optical principle was relied on to determine whether the barrel was straight. A fine linen thread, freed from "furze" (as one gunsmith expressed it), was threaded through the barrel and kept taut by a hickory rod, to which the projecting ends of the thread were tied. With the thread thus stretched inside the barrel, it was held up, preferably to the north, and pointed toward a white cloud. Looking through the barrel it readily could be seen if the string touched at every point. If not, a few blows of the hammer, skillfully applied at the proper place on the barrel, usually made it true, If this was not done on the first attempt, the process was repeated. Obviously, a crooked barrel would not make an accurately shooting rifle.
The next step was the rifling, the most important process of all. The rifling process, apparently complicated, is in reality simple. First, a "rifling guide" is prepared. Ordinarily this is made from a round stick of timber 2 to 3 inches in diameter and some 4-1/2 feet long. This is carefully turned to the requisite size in a lathe (Figure 1) and then the circumference is divided accurately into five or seven equal parts.4 A wythe of pliant oak about one-quarter of an inch wide and some 6 feet long is then prepared (Figure 2). One end of the wythe is fastened to the center of one end of the guide with a nail in such manner that it rotates freely. Starting at one of the seven divisions, the wythe is wrapped carefully around the wooden cylinder so that it makes exactly one symmetrical turn in the entire length; that is to say, one turn in approximately 48 inches.
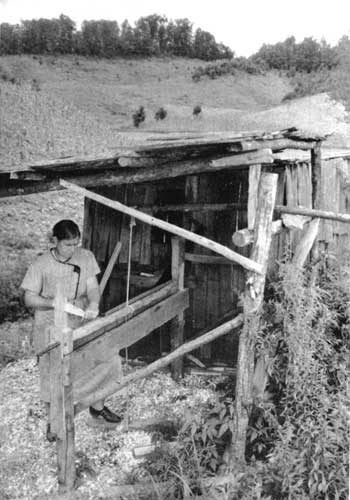 Figure 1. Turning a rifling guide on a primitive lathe. |
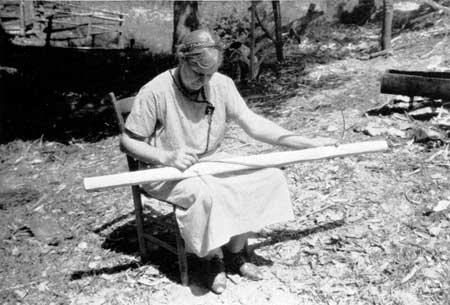 Figure 2. Wrapping the oak wythe symmetrically around the rifling guide. |
A pencil mark is then made along the side of the wythe (Figure 3) and this process is repeated for each one of the remaining divisions.
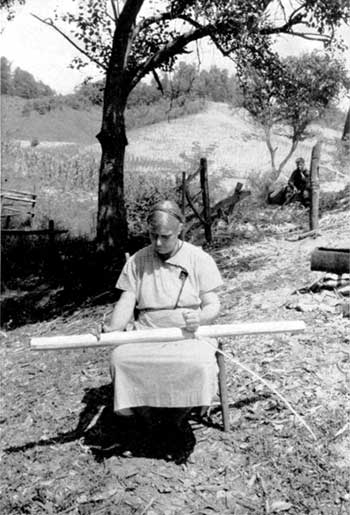 Figure 3. Marking the spirals on the rifling guide. |
When this step is complete, there will be seven spiral marks (or five), equally and symmetrically spaced around the wooden cylinder, and these indicate the twist or speed of the rifling. With each one of these seven symmetrical spiral marks successively as a guide, a second spiral line about a quarter of an inch away is drawn exactly parallel to each of the seven original sets of spiral markings. The wood between each of these seven paired parallel lines is carefully removed to a depth of perhaps a half inch, leaving as the final stage in the preparation of this rifle guide a wooden cylinder having a set of seven symmetrical spiral bands each turning once in about 48 inches (Figure 4). At this stage the wooden cylinder looks very much like a long wooden threaded bolt. If the spiral or twist of the rifles was much sharper than one turn in 48 inches, the weapon would be ineffective. The bullet, as the mountain men would say, "would strip its patch" at the higher speed of rotation. Consequently, the majority of the rifles, at least those in the Great Smoky Mountains, have on the average a spin or twist of approximately one turn in 48 inches.
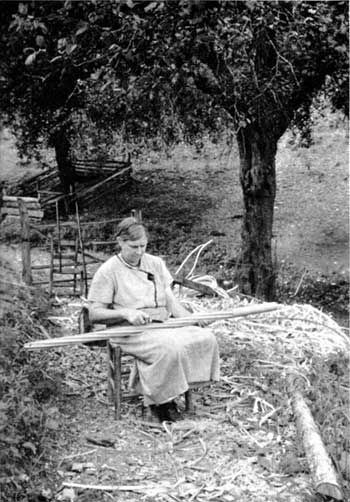 Figure 4. Cutting the rifling guide. |
After the rifling guide is made as described, a "head block" is prepared. The head block is a piece of hardwood about an inch thick and 5 or 6 inches wide, having cut in it a hole which is the exact reverse of a cross section of the rifling guide with its spiral bands. In other words, the head block bears the same relation to the rifle guide as a nut does to a bolt. Ordinarily the bearing surfaces in the head block were lined with leather which, when well greased, allowed the ridges of the rifle guide to slip through with ease (Figure 5).
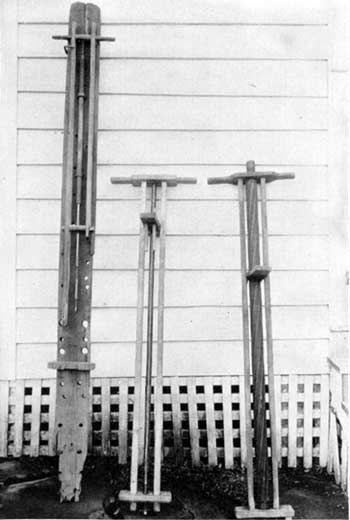 Figure 5. Types of rifling guides from the Great Smoky Mountains. (1) by W. H. Keller, Maryville, Tenn. The head block is a rifle barrel. The rifling guide is an iron rod with lead plugs cast on it, fitting the grooves of rifles of the barrel; (2) an iron rifling guide with its head block obtained from William Douglas, of Parrotsville, Tenn.; (3) a wooden rifling guide and its head block, also from William Douglas. |
The rifling guide and head block are mounted on a stout timber long enough to hold both the barrel of the rifle and the full length of the rifle guide is one straight line. This timber is firmly anchored so that it is immovable, and the head block is fastened permanently to it near one end in such a manner that when the rifle guide is threaded through it, the latter can be moved back and forth its full length without undue vibration, imparting meanwhile the proper rotation to the rifling tool (Figure 6). The rifle barrel is mounted in the exact axis of the rifling guide, so aligned that the rifling tool, which will be described immediately, will pass through the barrel in response to a back-and-forth motion of the rifling guide as it is moved back and forth. A twist corresponding to the twist of the guide is imparted to the rifling tool, which in turn cuts the grooves or rifles in the barrel.
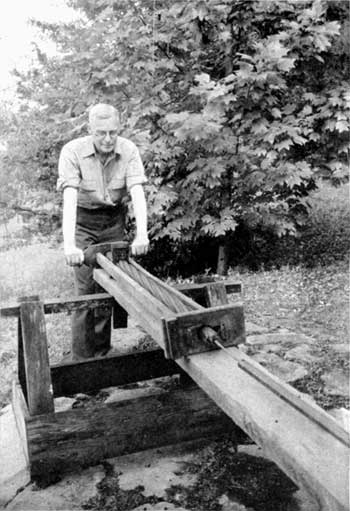 Figure 6. Rifling guide set up showing head block and part of rifling rod fastened to rifling guide and inserted into barrel of rifle. |
The rifling tool consists of a steel rod somewhat more than 4 feet in length and of a diameter somewhat less than the bore of the rifle. One end of this rod is fastened firmly to a chuck or slot in the end of the rifling guide so that it will turn coincidentally with the guide. The other end, for a distance of some 4 inches, has cast upon it a lead block of exactly the bore of the rifle. This is done very simply by winding a string about the end of the rifling rod to form a narrow band equal to the bore of the rifle. Then the rifling rod is inserted into the end of the rifling barrel for a distance of some 4 inches. Melted lead is poured around the rifling rod. The lead is kept from running down the barrel by the string barrier. When the lead is hard the rod is removed from the rifle. It will be seen that there is moulded on the end of the rifling rod a lead plug of exactly barrel diameter.
The next step is to seat the "saw" in the lead plug. The saw is perhaps most easily pictured by visualizing a small section of a hacksaw blade having some six or eight teeth. This saw is inserted in the lead plug in such a manner that the teeth project very slightly from the side. In other words, the teeth of the saws have a very slight clearance or cutting surface. It is necessary to have the long axis of the saw align precisely with the line of twist of the rifling. This is done very simply by first threading the rifle guide into the head block; then the rifling rod is fastened by the clamp to the rifle guide and the other end of the rifling rod with its lead plug is pushed through the barrel of the rifle until about 2 inches project on the far side. Then, by means of a steel tool, whose width is exactly that of the "saw," a longitudinal groove is cut in the lead plug. This is done by moving the lead plug back and forth by alternately pushing and pulling on the rifling guide for the proper length, and deep enough so that the saw will be inset far enough to give rigidity. Ordinarily this depth is about one-sixteenth of an inch.
After the groove to hold the saw has been cut in the lead plug, the saw is put into its groove, the teeth projecting but very little. It is then ready for use. The rifling guide is threaded through the head block, one end of the iron rod (or rifling rod) is inserted into the end of the rifling guide, and then the other end carrying the lead plug and its saw, well lubricated with unsalted tallow, is inserted into the end of the barrel. Drawing the rifling guide back and forth through the head block imparts the proper spin to the saw the entire length of the barrel, and a spiral groove is thereby cut, turning one in about 48 inches (Figure 7).
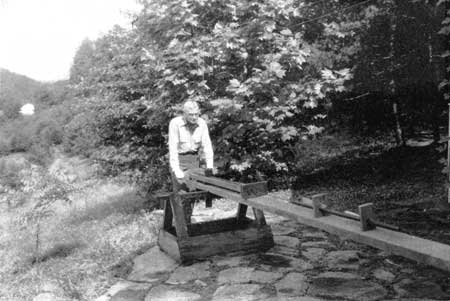 Figure 7. Complete assembly for rifling a gun—rifling guide, head block, rifling rod, and barrel of rifle. |
When the saw no longer cuts—in other words, when it has cut the groove as deeply as it can—the rifling guide is withdrawn from the head block and inserted again, one groove to the right, and the process repeated until all seven grooves successively have been cut out. It will be seen that by so doing seven parallel spiral cuts are made in the barrel. Then the saw is removed from the plug and raised up by putting a strip of paper at the bottom of the groove under the saw. Then the entire process is repeated. Eventually, when the rifles are cut "ten to fourteen papers deep," as the mountain rifle makers would say, there results a rifle barrel having on its inside seven spiral grooves or rifles, the counterpart of the rifling guide so far as twist is concerned, and deep enough to impart a spin to the bullet when the rifle is fired.
Next, the newly rifled barrel has to be "dressed out"; that is, to smooth the rifles or grooves, and the ridges between these grooves, called the "lands." To perform this operation, a "dressing stick" must be prepared. This is made upon a hickory rod somewhat less in diameter than the bore of the rifle. On one end of the hickory rod, a lead plug is run in precisely the same manner as the original lead plug previously described was run on the end of the rifling rod, the difference being, however, that this time the lead plug on the end of the dressing stick had the pattern of the rifles on it.
A saw corresponding to the original saw is inserted in the lead plug in exact alignment with one of the rifles and midway between the ends, and a second saw, the width of the lands, and in exact alignment with one of the lands, is inserted also. This dressing stick, well greased, is drawn back and forth through the barrel until the rifles are very smooth, evenly cut, and the lands between the rifles made smooth also (Figure 8). Usually from a full day to a day and a half was required to rifle and dress out a barrel in this manner.
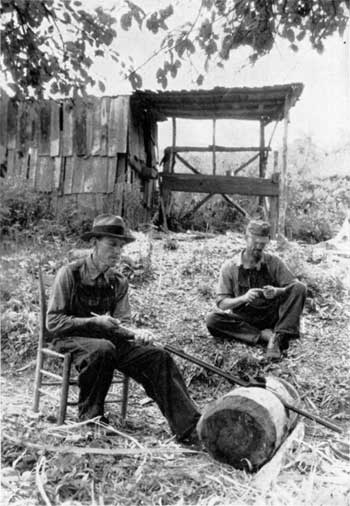 Figure 8. Dressing out the barrel of a rifle with a dressing stick. |
The calibre of the mountain rifles deserves a word of mention. Strictly speaking, these rifles had no calibre in the ordinary sense of the word. Usually, however, four kinds of rifles were made: one of about .35 calibre (0.35 inch) which was called a squirrel gun; one about .40 calibre (0.40 inch) called a turkey rifle; one about .45 calibre (0.45 inch) called a deer rifle; and one of approximately .50 calibre (0.50 inch) called a bear gun.
After firing from 80 to 150 rounds, it was often necessary to redress a rifle; that is, to resharpen the edges of the rifles and clean the lands. The redressing was done in the manner indicated above by means of a dressing stick provided with both rifle and land saws, and naturally the bore of the rifle became a little larger thereby. Also, it was usually necessary to cut off an inch and a half, or thereabouts, from the breech of a rifle that had been fired this number of rounds, because at this point, just in front of the breech block where the powder actually burns, the iron gradually becomes eroded and an enlarged chamber forms which eventually would cause the bullet to shed its patch. Therefore, the shooting age of a mountain rifle can be approximately guessed at by the length of the barrel. It will be remembered that 48 inches was ordinarily the original length.
To finish the barrel after the rifling is complete, several more steps are necessary. First, a thread has to be cut in the breech and in this is screwed the iron breechblock which closes the rear end of the barrel. Usually the breechblock was made with a tang from 2 to 4 or 5 inches long. One or two holes, drilled in the tang, provide entrance for screws, which, passed through these holes, fasten the barrel securely to the stock. Next, if the rifle was a flintlock, a touchhole had to be bored in the side of the barrel about one-sixteenth of an inch in front of the breechblock. If the rifle was one of the percussion type, in place of the touchhole, a hole was drilled and threaded barely in front of the breech block in which was fitted the side tube carrying the nipple for the percussion cap. Two or three metal tabs were also brazed lengthwise along the barrel through which holes were made. Metal pins were driven through these to fasten the barrel securely to the stock. The addition of front and rear sights completed the barrel.
The front sight was usually of the knife type and the notched, immovable rear sight set ahead of the breechblock some 6 or 7 inches. This gave a long sighting base which accounts in no small measure for the accuracy of these remarkable weapons.
The trigger and lock mechanisms (Figures 9 and 10) were then made. If the rifle was a flintlock, the hammer or cock had a screw clamp or vise in it to hold the flint, which, parenthetically, was always set in a piece of thin leather. A hinged frizzen was made of steel upon which the descending flint would strike a glancing blow, throwing the frizzen forward, allowing the sparks to fall in the small pan which was in front of and below the hammer and directly opposite the touchhole. The lock or hammer (Figure 11) for a percussion rifle was of the orthodox shape familiar to everyone. Usually the striking face of the lock was hollowed out a bit to fit over the cap and deflect any sparks.
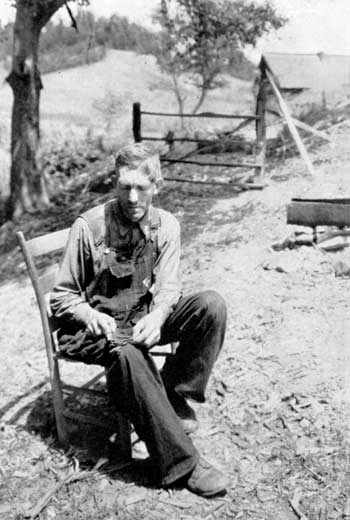 Figure 9. Making the lock (hammer) mechanism of a rifle. |
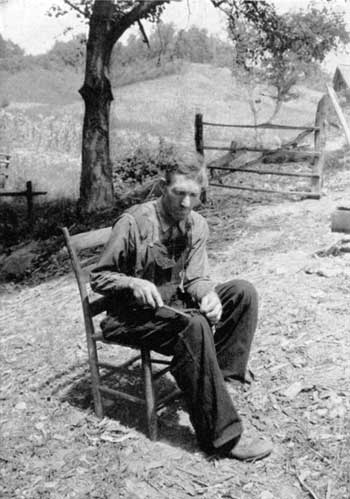 Figure 10. Making the double triggers for a rifle. |
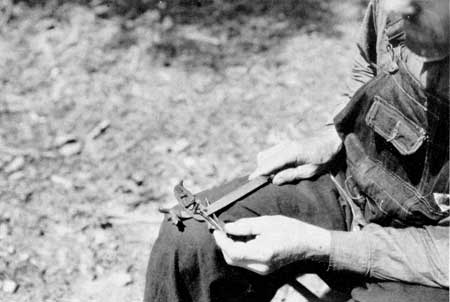 Figure 11. Details of the lock (hammer) mechanism of a percussion-type rifle. |
Ordinarily the triggers were double (Figure 12); that is, there was both a set trigger and a hair trigger, the set trigger being behind, the hair trigger ahead of it. A small screw between the two regulated the tension, and therefore the lightness of pull of the hair trigger. To manipulate the firing mechanism of a percussion cap rifle, first the triggers were set; that is, the hind trigger—"the hindmost one," as the mountain people would say—was pulled until it clicked. This set the hair trigger. Then the hammer was raised, and having previously put a cap on the nipple and loaded the gun, the arm was ready for firing. A very light touch sufficed to release the trigger.
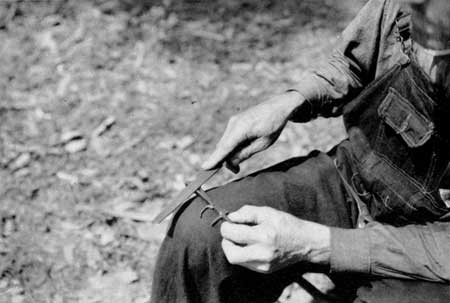 Figure 12. Details of double (set) trigger for a rifle. |

|

|

|
|
|
Last Modified: Sat, Oct 20 2001 10:00:00 am PDT |